
Display web dynpro ALV report select options to resict output results
Here are the simple instruction of how to add select options to a web dynpro ALV table. You first need to have created a Basic Web Dynpro ALV table, Once you have this you can follow the basic steps below to implement the select options.
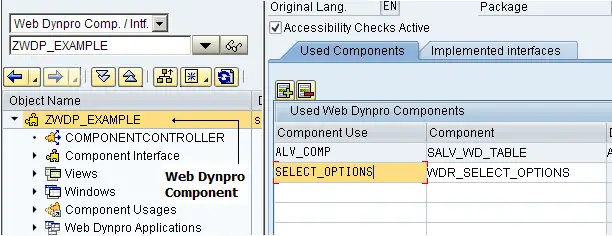
Step 1 - Assign ALV Component usage
Within the Used Components tab of the web dynpro component, add a new component usage WDR_SELECT_OPTIONS and give
it a usage name of your choice such as SELECT_OPTIONS.
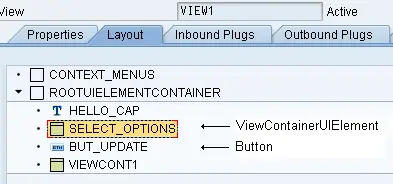
Step 2 - Add new UIElements to view
Within the layout tab of your display view(VIEW1) you need to add two new elements a ViewContainerUIElement (SELECT_OPTIONS)
and a Button (BUT_UPDATE)
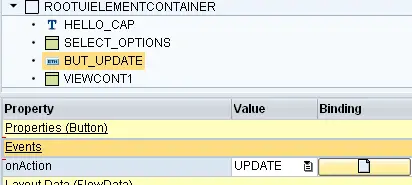
Step 3 - Enter button text
Add some text to the button which will be display on the actual button

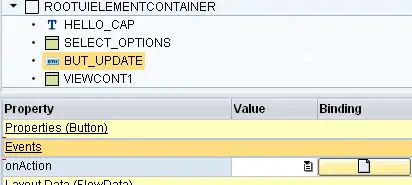
Step 4 - Assign Action to button
Within the events property of your newly created button, click on the create icon
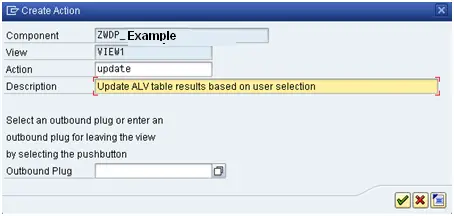
Step 5 - Create Action
Give action a name(UPDATE) and description
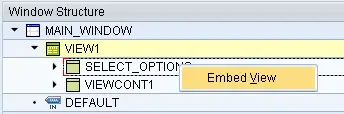
Step 6 - Embed the ALV SELECT OPTIONS into VIEW Container
Go to your main window where the view (VIEW1) has been embeded. Expand the view until you reach the VIEW Container
SELECT_OPTIONS. Now right click on the View Container and select 'Embed View'
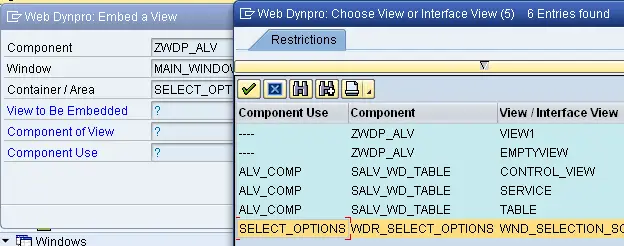
Step 7 - choose view to embed
Click the drop down option of the 'View to Be Embedded' field and select the TABLE view of your ALV component usage (SELECT_OPTIONS).

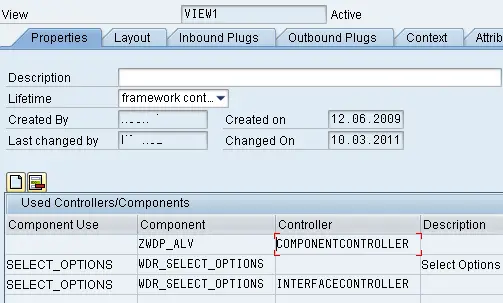
Step 8 - Add component Use to view
Within the Properties tab of your View click on the create controller usage button and add the two entries releated to your ALV SELECT_OPTIONS component use (SELECT_OPTIONS).
These have to be added one at a time.
Step 9 - Create view attributes
Within the attributes tab of your view create two attributes/fields with the following details
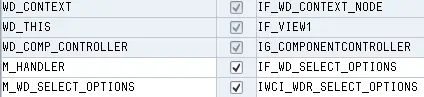
M_HANDLER		IF_WD_SELECT_OPTIONS
M_WD_SELECT_OPTIONS	IWCI_WDR_SELECT_OPTIONS
Step 10 - Add ABAP code to create selection fields
Next you need to add the following ABAP code to your WDDOINTINIT or where ever you want as long as it happens before your view is displayed.
  CONSTANTS: c_yes TYPE abap_bool VALUE 'X',
             c_no TYPE abap_bool VALUE ' '.
  DATA: lt_range_table TYPE REF TO data,
        rt_range_table TYPE REF TO data,
        read_only      TYPE abap_bool,
        type_name      TYPE string.
  DATA: l_ref_cmp_usage TYPE REF TO if_wd_component_usage.
* Set up selection area
  l_ref_cmp_usage = wd_this->wd_cpuse_select_options( ).
  IF l_ref_cmp_usage->has_active_component( ) IS INITIAL.
    l_ref_cmp_usage->create_component( ).
  ENDIF.
  wd_this->m_wd_select_options = wd_this->wd_cpifc_select_options( ).
  wd_this->m_handler = wd_this->m_wd_select_options->init_selection_screen( ).
  lt_range_table =
  wd_this->m_handler->create_range_table( i_typename = 'S_CARR_ID' ).
  wd_this->m_handler->add_selection_field( i_id = 'S_CARR_ID'
                                           it_result = lt_range_table
                                           i_read_only = abap_false ).
  wd_this->m_handler->set_global_options( i_display_btn_cancel = abap_false
                                          i_display_btn_check = abap_false
                                          i_display_btn_reset = abap_false
                                          i_display_btn_execute = abap_false ).
Step 11 - React to user input
Now you need to add the following ABAP code to the ACTION you created earlier UPDATE, associated method will be called
ONACTIONUPDATE.
 DATA: node_flights TYPE REF TO if_wd_context_node,
        rt_carrid TYPE REF TO data,
        rt_connid TYPE REF TO data.
* create table based on context structure
  data: it_scarr type STANDARD TABLE OF if_view1=>element_ALV_TABLE,
        wa_scarr like line of it_scarr.
  FIELD-SYMBOLS:  TYPE table,
                  TYPE table.
  rt_carrid = wd_this->m_handler->get_range_table_of_sel_field(
  i_id = 'S_CARR_ID' ).
  ASSIGN rt_carrid->* TO .
*select data from required SAP table
  select *
    from scarr
    into table it_scarr
   WHERE carrid IN .
  node_flights = wd_context->get_child_node( name = 'ALV_TABLE' ).
  node_flights->bind_elements( it_scarr  ).
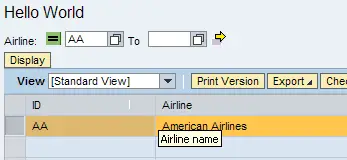
Step 12 - All done
If you now execute the application it should look similar to this
Related Articles
BIND_STRUCTURE method of interface IF_WD_CONTEXT_NODE to assign structure to context
BIND_TABLE method of interface IF_WD_CONTEXT_NODE
Get the name of the button the user has clicked on within the SAP web dynpro action ABAP code
Create field Refering to datatype of webDynpro context element
WebDynpro context for creation of screen field including standard search help
Disable SAP User Personalisation in Web Dynpro app using WDDISABLEUSERPERSONALIZATION and WDENABLEUIELEMENTSHIDE
GET_ATTRIBUTE method of interface IF_WD_CONTEXT_NODE to retrieve value of context element
GET_SELECTED_ELEMENTS to get selected row of ABAP web dynpro table when not using lead selection
GET_STATIC_ATTRIBUTE_TABLE method to return all rows of a context table node
IF_WD_CONTEXT_NODE interface methods withn ABAP Web Dynpro to enable users to view and change data
ABAP code to manually trigger ABAP web dynpro plug
Popuate SAP WebDynpro field
Freely Programmed search help for your web dynpro application (custom value help/OVS)
Change the stylesheet theme used by your web dynpro and portal apps (i.e. SAP_TRADESHOW, SAP_CORBU)
Change the stylesheet theme used by your web dynpro and portal apps (i.e. SAP_TRADESHOW, SAP_CORBU)
SET_ATTRIBUTE method of interface IF_WD_CONTEXT_NODE to assign value to individuale context attribute
Clear context attribute using SET_ATTRIBUTE_NULL method of interface IF_WD_CONTEXT_NODE
Add Dropdown by index UI Element to table field within abap web dynpro
Add freely Programmed search help to a web dynpro application field
Retrieve SAP webDynpro field value entered by user
ABAP Web dynpro ALV report table
Hide fields of a web dynpro ALV table
Assign value to ABAP web dynpro context via table, structure or individual attribute
Get selected ABAP Web dynpro dropdown byindex value (dropdownbyindex UI element)
ABAP web dynpro Dropdown by index UI Element allows a field to display a drop down list of values
ABAP web dynpro Dropdown default value, allow you to set current value of dropdown UI element
Change SAP web dynpro logon screen
Read ABAP Web dynpro table context on action / button click
ABAP Web Dynpro tables to allow users to view and change data
Get selected row of ABAP web dynpro table
Get all selected rows of table within your web dynpro for ABAP applications using GET_SELECTED_ELEMENTS
Get selected row of ABAP web dynpro table
ABAP Web Dynpro tree structure, display HR org structure as example
SAP ABAP Web Dynpro UI elements
View Container UI Element to display a web dynpro view within a wdp view
ALV ABAP Web Dynpro application
ABAP Web dynpro button click / Action
Call URL from SAP Webdynpro for ABAP ACTION
Call URL from SAP Webdynpro for ABAP ACTION
Display popup screen within ABAP Web dynpro
ABAP Web dynpro populate table on action / button click
ABAP code to Print abap web dynpro table
Adding URL parameters to you ABAP webdynpro to change thinks like the CSS